mLab OB-SX MIDIcontrol
Orders are welcome here
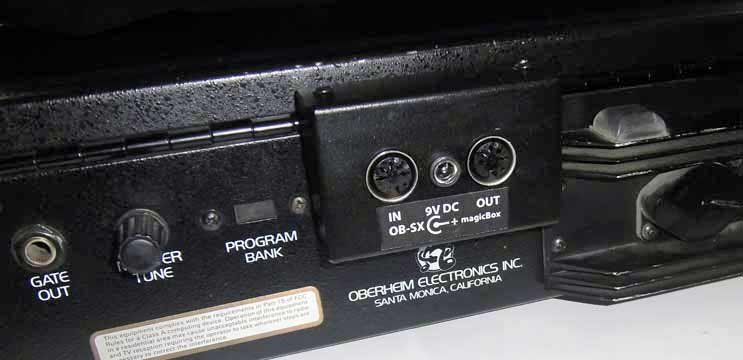
The magicBox transforms your OBSX into a MIDI-controlled synthesizer with real-time access to over 40 parameters including note numbers, pitch, modulation, and program changes. It also includes 56 additional presets and 56 user memories. This MIDI interface is compatible with all generic MIDI controllers capable of processing parameter feedback.

made in Germany by mLab.midisoft.de
Power Supply
This MIDI interface requires an external power supply (not included).
The power supply should output 9V DC, where the center pin is positive (+).
If you prefer not to use an external power supply, you can power the magicBox from your synthesizer by performing a simple modification.
Plug & Play
The installation is much easier than with any other MIDI retrofit kit.
We leave your Oberheim synthesizer completely untouched.
Simply plug the magicBox into the Oberheim COMPUTER INTERFACE port and play.
Everything under control
- NoteNumber
- ProgramChange
- Modulation
- PitchBend
- EDIT, COPY, PASTE, STORE
- 56 additional ROM presets
- 56 additional USER Memories,
- SysEx dump and more.
- RealTime access to all parameters
MIDI controller details
OB-SX controls
CC# 06 VCF ATTACKCC# 07 VCA ATTACK
CC# 08 VCF DECAY
CC# 09 VCA RELEASE
CC# 10 VCF FREQUENCY
CC# 11 OSC 2 DETUNE
CC# 12 LFO FREQUENCY
CC# 13 PORTAMENTO
CC# 14 VCA DECAY
CC# 15 VCF SUSTAIN
CC# 16 VCA SUSTAIN
CC# 17 VCF RELEASE
CC# 18 RESONANCE
CC# 19 VCF ENV AMOUNT
CC# 20 PULSE WIDTH
CC# 21 MODULATION
CC# 22 PWM
CC# 23 OSC 2 FREQUENCY
CC# 24 OSC 1 FREQUENCY
OB-SX switches
CC# 25 (ch1) OSC 2 FMCC# 25 (ch2) VCF MOD
CC# 25 (ch3) OSC 1 WAVE
CC# 25 (ch4) OSC 2 WAVE
CC# 25 (ch5) LFO WAVE
CC# 25 (ch6) OSC 1 FM
CC# 26 (ch1) OSC 1 PWM
CC# 26 (ch2) OSC 2 PWM
CC# 26 (ch3) VCF TRACK
CC# 26 (ch4) OSC 2 HALF
CC# 26 (ch5) SYNC
CC# 26 (ch6) X-MOD
CC# 26 (ch7) UNISON
Additional controls
CC# 1 MIDI Mod Wheel
CC# 77 Mod Wheel MIDI-Amount
CC# 79 Keyboard Mode Switch (Cycle On/Off)
CC# 85 Preset Encoder 1-56
CC# 86 Memory Encoder 1-56
CC# 87 LOAD Switch
CC# 88 SAVE Switch
CC# 107 DUMP Switch (MIDI SysEx Dump)
CC# 120 (ch16) Number of Voice Cards
CC# 120 (ch15) MIDI Channel 1-16
where 0 = OMNI MODE
affects Notes, Pitch, ModWheel and ProgramChange
Program change 1-112
PG 001-056 = Preset (1-56)PG 057-112 = User-Memory (1-56)
MIDI communication
MIDI IN to the Oberheim Synthesizer
- NoteNumber
- ProgramChange
- Modulation
- PitchBend
- ControlChange
- SysEx
MIDI OUT from the magicBox
- Parameter-Feedback
- SysEx
1. MIDI SysEx dump
MIDI CC 107 (value 127) causes the magicBox to send a SysEx dump of all 56 user memories to MIDI OUT, allowing you to back up your sounds.
You can recover them by sending the SysEx file back to the magicBox. This will automatically replace all 56 user memories.
2. PARAMETER FEEDBACK
After a MIDI Program Change or Program Load, the magicBox sends the current program parameter values to MIDI OUT. When a BCR2000 or another controller (which can process parameter feedback) receives such a message, it updates its encoder and displays the result with its LED bar graph. Now you know exactly where you are, and you can visually edit your program in relation to the current settings. To avoid MIDI feedback loops with a BCR2000, use Stand Alone-Mode S-3 by pressing EDIT & STORE simultaneously. Turn the left encoder in the top row until the display shows S-3. Then press the EXIT button to complete the process.
MIDI hardware controller
Successfully tested
- Behringer BCR2000
- DJ Techtools Midi Fighter Twister
- Touch-OSC for iPad
- TB-MIDI-Stuff for iPad
Other generic MIDI controllers should work as long as they can handle parameter feedback.
Download all you need to setup your MIDI controller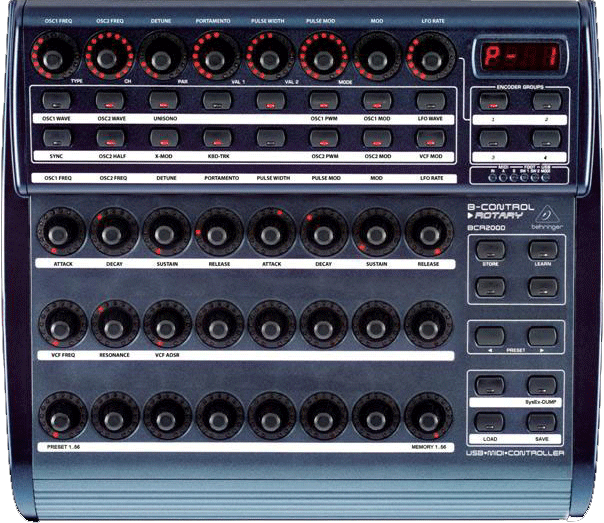
How to Setup a BCR2000
-
Set your BCR2000 to receive MIDI data via the MIDI input.
Hold down the EDIT button and press the STORE button.
Use the first encoder in the top row to choose S-3. -
Make sure your BCR has the correct SysEx ID by using the 5th rotary encoder in the top row
and set it to ID number 1.
At least press the EXIT button. - Now send the SysEx file to your BCR2000.
Successfully incoming SysEx data is shown in the display as a circular movement.
The BCR first saves the incoming data in a temporary memory area.
Before this data can be used, it must be saved in one of the 32 BCR2000 PRESETS.
In order to do this,
-
Press the STORE button, (the store LED blinks).
-
Use the PRESET cursor keys to select a preset location.
- Press STORE again.
That's it.
Now you have this controller layout
BCR2000 Overlays, repectively Decals, are available here
So richten Sie Ihren BCR2000 ein
- Stellen Sie Ihren BCR2000 so ein, dass er MIDI-Daten über den MIDI-Eingang empfängt.
Halten Sie die EDIT-Taste gedrückt und drücken Sie die STORE-Taste.
Verwenden Sie den ersten Encoder in der oberen Reihe, um S-3 auszuwählen.
- Stellen Sie sicher, dass Ihr BCR die richtige SysEx-ID hat.
Verwenden Sie den 5. Drehgeber in der oberen Reihe, um die ID auf Nummer 1 zu setzen.
Drücken Sie zum anschließend die EXIT-Taste.
- Senden Sie nun die SysEx-Datei an Ihren BCR2000.
Erfolgreich eingehende SysEx-Daten werden im Display als kreisförmige Bewegung angezeigt.
Der BCR speichert die eingehenden Daten zunächst in einem temporären Speicherbereich.
Bevor diese Daten verwendet werden können, müssen sie in einem der 32 BCR2000 PRESETS gespeichert werden.
um dies zu tun,
-
Drücken Sie die STORE-Taste (die Store-LED blinkt).
-
Verwenden Sie die PRESET Cursortasten, um einen Speicherplatz zu wählen.
- Drücken Sie erneut STORE.
Das war's
Nun haben Sie dieses controller layout
BCR2000 Overlays, bzw. Decals, sind hier erhältlich
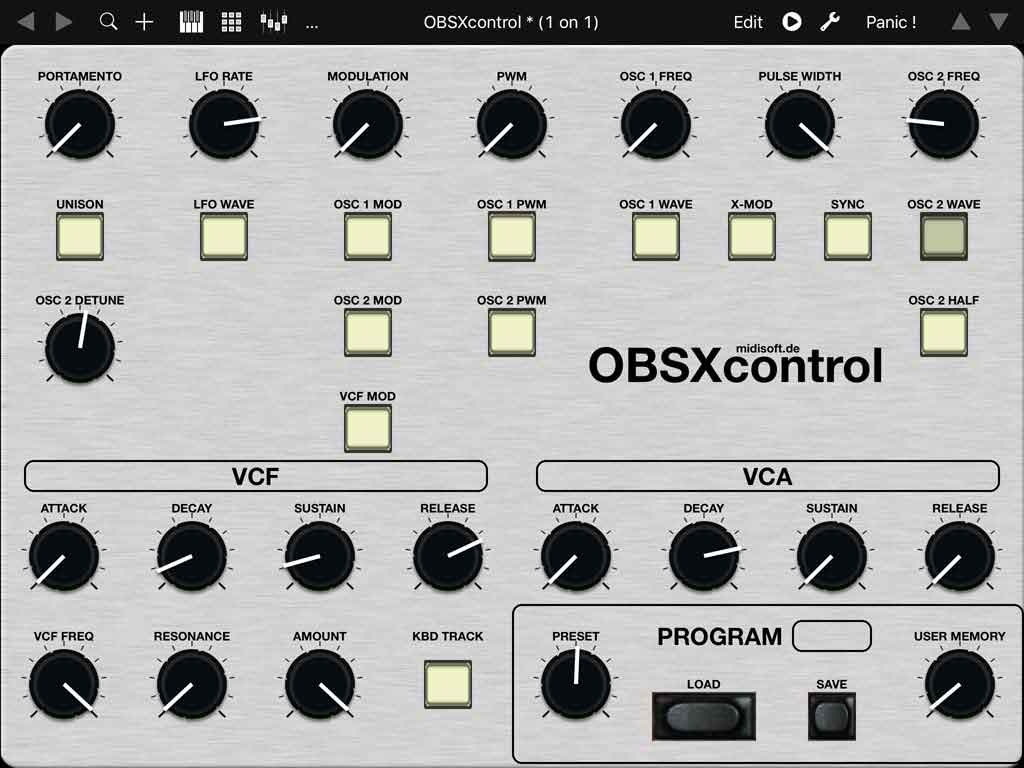
User Memory management
Example Copy, Edit and Save movie
-
Use the encoder in the lower left to select a preset (1..56).
-
Use the encoder at the bottom right to select a user memory (1..56).
-
For example, load the preset No. 33 by dialing the encoder at the bottom left until the display shows 33.
-
Then press the LOAD button. The preset No. 33 is now loaded and can be edited as required.
-
To save your changes in one of the 56 user memories, dial the encoder in the lower right to select a user memory location.
- Then press the SAVE button.
iPad
TouchOSC
download TouchOSC setup
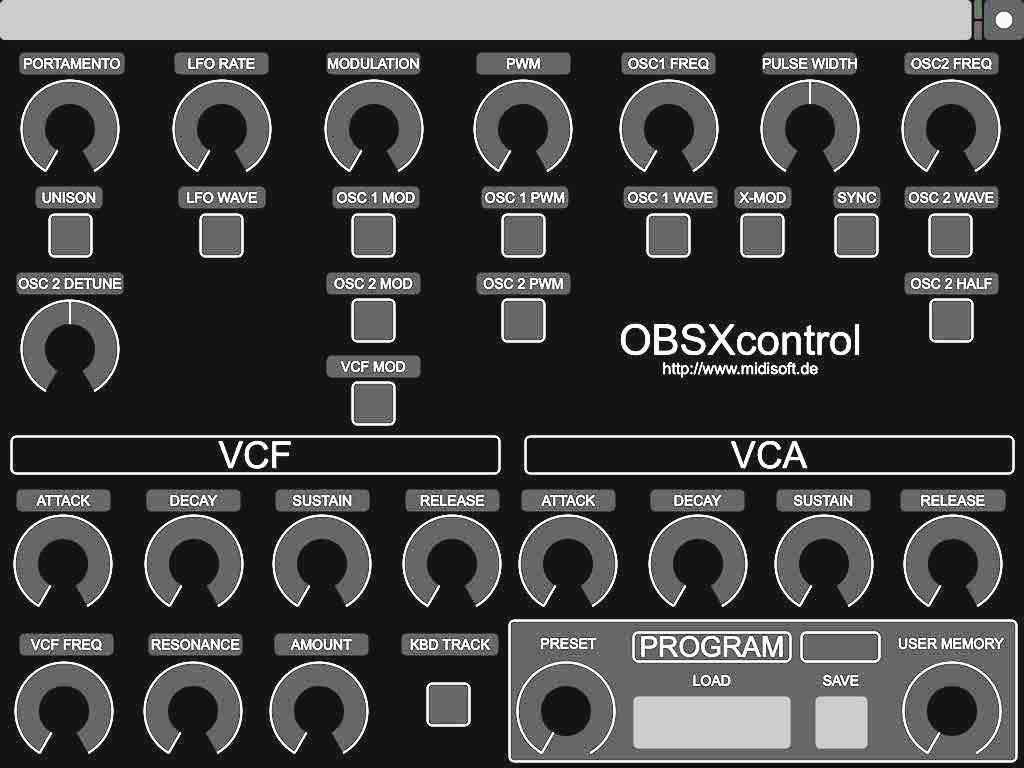
TB MIDI Stuff
download TBMS setup
©2021 R.Meurer mLab.midisoft.de